Indiana Limestone Ontario Distributor


Indiana limestone veneers are a testament to the timeless beauty and durability of natural stone. Revered for its unique blend of rich colors, fine grain, and consistent texture, this limestone has been a preferred choice for architects, builders, and homeowners for centuries. As a veneer, Indiana limestone offers the aesthetic appeal of solid stone construction but with the flexibility and ease of installation of a thin covering. Its adaptability ensures that it can be used in a variety of architectural styles, from classic to contemporary, making it a versatile choice for both interior and exterior applications. Whether used for a fireplace surround, an accent wall, or the facade of a grand edifice, Indiana limestone veneers bring a touch of elegance and enduring quality to any project.
What are stone veneers?
Stone veneers are thin slices of stone used to enhance or protect surfaces. One popular type of stone veneer is Indiana limestone, which is made from a sedimentary rock composed primarily of calcium carbonate. Indiana limestone is valued for its durability and aesthetic appeal, combining strength and beauty.
These veneers have a wide range of uses, including fireplaces and buildings, as they can withstand extreme temperatures and harsh weather conditions. Despite their thin profile, Indiana limestone veneers provide excellent protection while preserving the natural appearance and texture of the stone. The lightweight nature of stone veneer makes it ideal for projects where weight is a consideration.
Installing these veneers is also simpler compared to traditional solid stone construction, making them a cost-effective option for both residential and commercial projects. Stone veneers, particularly Indiana limestone veneers, offer an attractive solution to enhance the appearance and functionality of surfaces. Their durability, versatility, and easy installation make them suitable for a wide range of construction applications.
3 styles of Indiana Limestone Veneers
The trio of styles encompassed by Indiana limestone veneers are Vanderbilt Classic, Berkshire, and Rockford Estate Blend. Each offers distinctive aesthetics and flexibility in design for a variety of projects. The natural beauty and robustness of Indiana limestone veneers are renowned, making them a top pick for both indoor and outdoor uses.
Vanderbilt Classic
This style is characterized by a smooth surface and neat lines, conjuring up a contemporary, tailored aesthetic. Uniform rectangular stone flats contribute to its sleek design. This style comes with full color blend options, enabling customization to align with any project’s color palette.

Berkshire
These veneers exude a historical allure while delivering the robustness and adaptability inherent to Indiana limestone products. Clean edges coupled with a split face render this style suitable for both contemporary and traditional designs. The multi-color natural stone serves as an intriguing focal point, whether used as an accent or for covering entire walls or walkways.

Rockford Estate
This veneer boasts the most rustic appeal. A lightly-tumbled surface and a wide variety of shapes evoke a traditional, handmade look. The comprehensive color range fosters design creativity in diverse architectural projects.

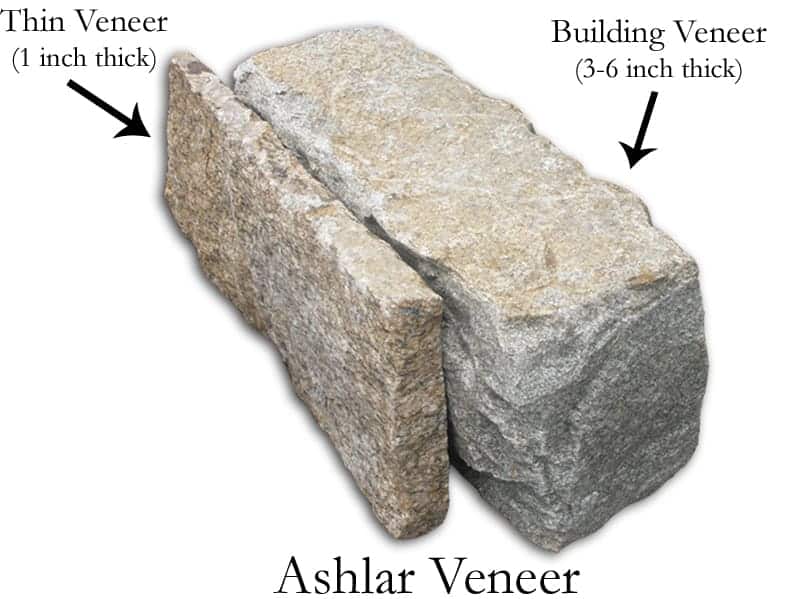
What is thinset veneer versus full bed veneer?
Here are the differences between thinset and full bed veneer:
Thinset Veneer: Think of it as the sleek, modern artist of the stone world. With its slim profile, typically less than 2 inches thick, Thinset is the go-to for those craving a contemporary look without the weight of traditional stone. It’s lightweight, making it perfect for quick renovations and overlays. Plus, with its easy-to-install nature, it’s a favorite among DIY enthusiasts and professionals alike.
Full Bed Veneer: The grandeur of classic stonework comes alive with Full Bed Veneer. Boasting a thickness that can range from 3 to 5 inches, it’s the embodiment of depth and dimension. This veneer is all about making a bold statement, offering the robustness and authenticity of age-old masonry. It’s the choice for those seeking a touch of tradition and a foundation that stands the test of time.
In essence, while thinset offers a chic, streamlined appeal, full bed veneer brings depth and a touch of time-honored elegance. Whichever path you choose, both promise to transform spaces with their unique charm!
When do you use thinset veneers vs full bed veneers?
Your choice between Thinset and Thickset veneer hinges on the specific demands of your project, be it aesthetic preferences, structural requirements, or budgetary considerations. Both options offer unique advantages, ensuring that your vision, whether modern or traditional, comes to life in stone.
When to Use Thinset Veneer:
- Lightweight Applications: Thinset veneer, with its slender profile, is ideal for surfaces that may not support the weight of thicker stone, such as certain interior walls or facades.
- Quick Renovations: If you’re looking to revamp a space without delving into extensive structural changes, Thinset is your ally. It’s perfect for overlaying existing surfaces.
- Cost Efficiency: Given its thinner nature, Thinset often requires less material, making it a more cost-effective choice for large areas.
- Modern Aesthetics: For projects that demand a sleek, contemporary look, the streamlined appearance of Thinset veneer fits the bill.
When to Use Thickset Veneer:
- Robustness & Authenticity: Thickset veneer offers a more traditional stone appearance, giving structures a sense of solidity and timelessness.
- Exterior Applications: For outdoor projects, especially in regions with harsh weather conditions, Thickset veneer provides added durability and resistance.
- Structural Integrity: When building from scratch or when the foundation can support more weight, Thickset veneer is often preferred for its stability and longevity.
- Deep Profiles & Shadows: The depth of Thickset veneer allows for pronounced shadows and texture, enhancing the visual appeal of a structure.
Install Indiana Limestone Veneers: Basic Tips
Whether you’re a seasoned professional or a DIY enthusiast, the installation process is straightforward, especially when equipped with the right knowledge. Drawing inspiration from the Polycor Thin Veneer Installation Guide, we’ve distilled the various steps and provide tips to help ensure your veneer installation is seamless and enduring.
Preparation:
- Ensure the surface where the veneer will be applied is clean, dry, and free of any debris.
- Gather all necessary tools and materials, including the thinset veneer pieces, adhesive, trowel, spacers, and safety gear.
Surface Evaluation:
- Check the integrity of the surface. It should be sturdy and free of any defects that might affect the adherence of the veneer.
- For surfaces that are uneven, consider using a backer board or similar material to create a flat and stable base.
Adhesive Application:
- Using a notched trowel, spread a layer of adhesive onto the surface. Ensure it’s spread evenly and covers the entire area where the veneer will be placed.
- Follow the manufacturer’s instructions regarding the thickness and type of adhesive to be used.
Veneer Placement:
- Start placing the thinset veneer pieces onto the adhesive-covered surface. Press firmly to ensure good contact.
- Use spacers between each veneer piece to maintain consistent gaps for grout or to achieve the desired pattern.
Cutting & Fitting:
- For edges or corners, you may need to cut the veneer pieces to fit. Use a suitable cutting tool and ensure clean, straight cuts.
- Always measure and mark the veneer before cutting to ensure accuracy.
Drying & Setting:
- Allow the adhesive to set for the recommended time, usually 24 hours. Avoid any pressure or disturbance to the veneer during this time.
- Ensure the environment is conducive for drying – avoid extreme temperatures or moisture.
Grouting (if applicable):
- If your design requires grout between the veneer pieces, mix the grout according to the manufacturer’s instructions.
- Using a rubber float, apply the grout into the gaps between the veneer pieces, pressing firmly to fill all voids.
- Wipe away any excess grout with a damp sponge, ensuring the veneer surface remains clean.
Final Touches:
- Once the grout has dried, clean the veneer surface with a soft cloth to remove any residue.
- Seal the veneer, if necessary, to protect it from moisture and stains.
Maintenance:
- Clean the veneer regularly with a soft cloth and mild detergent. Avoid abrasive cleaners that might scratch the surface.
- Inspect the veneer periodically for any signs of damage or wear and address them promptly.
Remember, while this is a basic guide, always refer to the specific instructions provided by the veneer and adhesive manufacturers to ensure the best results. Safety precautions, such as wearing gloves and protective eyewear, should also be observed throughout the installation process.